Guess I’m Not Quite Done Yet

After my last post, I took the CB650 for a short ride around town, and I thought it felt like the front brake was dragging.  Well, it is.  I suspected the caliper (as I’ve had a similar problem in a car before and that was the source), but after discussing my plans on the Honda CB650 forum here I learned it’s probably the master cylinder.  Specifically, I need to clean it out, making sure the fluid return hole is clear.

While searching for a rebuild kit for my bike, I found this:

https://www.amazon.com/gp/product/B00D0MSX36

Yes, you can just buy a complete replacement unit, clean and new with a full set of spare parts, and it’s cheap.  But… I read some reviews of this unit, and decided against it.  It does not have the capacity of the stock unit, so I’d have to pay closer attention to the fluid level.

Instead, I’m getting a K&L rebuild kit, their part number 32-1464.  Got it on Amazon.com here:

https://www.amazon.com/gp/product/B001KO4WFY

I’ll have to drain the existing fluid, dismantle, clean, and refurbish the master cylinder, put it all back together, and finally refill and bleed the system.  I’ve picked up a bottle of fresh DOT 3 fluid and some clear plastic tubing, so as soon as the rebuild kit comes in, I’ll get started.

In other words… more later.

Things Made of Rubber, Part 2

I rode the CB650 maybe another 1,500 miles after the last post.  The smell of gasoline got stronger each time; I found I had to put the bike away with the petcock closed or the garage filled up with fumes.

I finally quit riding it when I realized raw gas was leaking out of the carbs.  I also discovered an oil leak, coming out around the shift shaft and dripping onto the left exhaust pipe.  It was evidently leaking only while the bike was running, so there was no puddle in the garage to reveal the leak.

There was no avoiding it… my bike needed professional help.

I asked a fellow rider who owns a vintage Japanese bike who he would trust to do the work, and he recommended Cycle Tech at Fremont, Iowa.  When I say “at” Fremont, I mean out in the middle of nowhere north of Fremont (which is itself somewhat like the middle of nowhere).

So I called up the man in charge and discussed my bike’s issues, and he shot me an estimate.  It was more than I hoped, but less than I feared, and I took him up on it.

They pulled the carbs, fitted new gaskets and seals, put ’em back together and synced them up.  They also replaced the bad seal on the shift shaft… problem solved.

Things made of rubber, you know?

I didn’t think to ask them to change the oil, but I picked up oil and a new oil filter when I went back to get the bike.

So anyway, moving on… last weekend I set out to change the oil in the CB650.  Draining it was easy, but the oil filter bolt head was pretty chewed up.  I couldn’t get a wrench to grab it, nor would my hex-head vice grips do it.

Finally I put curve-jaw vice grips on it, clamped down as tight as I could get them, and tapped on the vice grips with a rubber mallet.  After a few judicious whacks, the bolt broke loose, and I was able to complete the job.

I considered getting a replacement OEM bolt (Honda part number 15420-333-000), but the few places that had them listed the price at around $55.00.  There had to be a better solution… and there is.  I discovered that Emgo makes a replacement oil filter bolt for the CB650, and it has a 17mm head instead of the 12mm head on the stock unit.  Should be harder to round it off.  The Emgo part number is 11-46400; Amazon.com has it here for $14.97 with free shipping, which is much better than the OEM part price.  K&L Supply also makes a replacement for this bolt, their part number 19-1387, available on Amazon.com here for $15.93 + $8.74 shipping; still a better deal than the OEM part.  Of course, these prices are just good for right now, and will surely change in the future.

Just for the record, I checked some other vendors for this part.  Dennis Kirk has it here, for $16.95 plus shipping.  Rocky Mountain ATV/MC does not seem to have it, which I suppose isn’t that odd given their obvious off-road focus, except that they do have many other parts for the CB650 including the K&N oil filter, and they carry other Emgo parts.  Didn’t find the K&L bolt on either site.

For the moment I’m going to use the existing bolt, but when the bike is due for another oil change I’ll get a replacement.

While changing the oil, I thought about other periodic maintenance items, and decided I should service the air cleaner as well.  I pulled it out and discovered it was soaked with old gasoline.  I knew the bike had backfired from time to time, especially when cold or running on choke, so I assumed it had been blowing gas back into the airbox.  (I’m hoping that sealing the carbs has fixed the backfire issue.)

Well, then.  Time for a new air cleaner.  I ordered an Emgo replacement, part number 12-90700, on Amazon.com here.  The current price is $10.69 with free shipping.  The Honda OEM number is 17211-460-000.  Note that the only shop manual I’ve found online is for the 1979 model year; they completely changed the airbox and filter in 1980.  If you have the 1979, this information won’t apply to you.

The replacement filter came in, so I set about installing it.  There’s a rubber seal that fits around the flange on the filter; you have to take it off the old filter and put it on the new one.  While I stood there putting the seal on the new filter I noticed a shine from inside the airbox.  A wet shine, to be exact.  I figured it must be some more gasoline.  I grabbed a big handful of paper towel and stuffed it into the airbox, then pulled it back out soaked with sour gas.  Did this twice more before I was sure I had it all… I was surprised how much was in there.

I went ahead and installed the new air cleaner and buttoned up the bike.  I now had a pile of gas-soaked paper towels… kind of a fire hazard, obviously.  I stuffed the paper towels into the box the new air cleaner came it, took the whole mess out to the driveway and set it on fire.  After a moment’s thought, I put the old gas-soaked air cleaner on top.

It all burned down to ash in about half an hour.  I fished the metal bits from the air cleaner out and threw them in the trash (after ensuring they were no longer hot enough to be dangerous), then stamped around on the ashes to disperse them.  All cleaned up.

I’m almost afraid to say it, but I think the bike is done.  I’ll try to remember to post some pictures soon!

Things Made of Rubber, Part 1

I mentioned the gas cap issues in my previous post.  Well, here’s what I did: I took some of my excess vacuum hose, slit it open lengthwise, filled it with some strong contact cement, then put it over the slot (trough?) that the gas cap seal is supposed to fit into.  I spread a little motor oil on the tank itself so the cap wouldn’t stick to it, then put the glued cap back on the bike.  The idea was to hold the rubber hose in position until the glue set up.

It mostly worked.  Unfortunately, a little bit of the glue made contact with the tank, and ate a couple of small spots of paint.  Fortunately the damage is hidden under the cap, but it does irritate me that I didn’t foresee the possibility.

Sadly, however, it only partly fixed the problem.  I know the cap was leaky because I could see gasoline vapor coming out and condensing on the tank with the cap in place; but, even with the new seal, it still smells of gasoline rather strongly.

Then I made another discovery, accidentally.  I put the kickstand down in a slightly uneven parking spot; it didn’t go down right, and I dropped the bike (in slow motion… I was doing my best to stop it, but I just couldn’t).  When I picked it back up, there was a spot of gasoline on the pavement.

I put two and two together and figured out that there must be a bad hose in among the carbs.  Probably one of those float bowl vent hoses.  I haven’t checked it out yet, but I have replacement hose on hand to fix it, hopefully soon.  For the moment, I’ve been turning off the petcock when the bike is parked, and that solves the stinky gas problem.

While trying (and failing) to see where the leak is, I noticed some of the carb drain hoses were off their nipples.  So of course, I tried putting them back on, but they just cracked.  The hose is a different size than the hose I have on hand, necessitating a trip to the auto parts dealer.  That, too, is a repair I haven’t done yet, but will get to soon.

If you have read all of the above, by now you understand the title of this post.  But wait, there’s more.

To date I’ve put 650 miles on the bike, including maybe 50 on the Interstate at 65 MPH.  Imagine my expression when I realized the previous owner never replaced the tires.

I was doing all that riding on thirty-six year old Cheng Shin tires.  Egad.

I did the only sensible thing… I parked the bike and set out to order tires.  Finding tires that would work on the CB650 was surprisingly hard.  None of the lower-priced brands could provide both a front and rear tire that would work.  I’m a bit of a Shinko fan, having run their tires on my Yamaha TW200 (in front, obviously, since there are almost no tires for the back of that bike besides the Bridgestone OEM tires), but they didn’t have a tube-type rear that I thought I could work with.

I jumped into a thread on the CB650 forum in hopes of getting some help.  The original Cheng Shin tires were a 100/90-19 front and a 120/90-17 rear.  I have the 1979 shop manual, and it prescribes 3.50H19 in front and 4.50H17 in back; a quick Google search led me to the Motorcycle Tire School section of Maxxis’ website, which informed me that the front tire converts to 100/90-19, and the rear converts to 110/90-17 or 120/90-17.  Obviously, this is consistent with what came on the bike… so far, so good.

The 100/90-19 front was easy to find in a number of brands and styles, but the 120/90-17 was surprisingly rare (remembering that I was looking for a “TT” tube-type tire).  Like, non-existent.  So I had to do something different.

The 120/90 tire would be 108mm tall.  A 130/80 tire would be 104mm tall… pretty close, and just 10mm wider (so losing 5mm of clearance on each side).  I used Bike Bandit’s sizing tool to search for that size, and found three dual-sport tires and the Bridgestone Battlax BT45.  Looking at the listing, I discovered that the only tube-type tire in the rear tire section was the 130/80-17… all the rest are tubeless.  Lucky, right?  But the darn thing was $132.95… ack.  I like Bike Bandit, but hey, I’m cheap, so I kept looking.

Amazon.com, it turned out, had that tire for $103.00 with Prime shipping, which sounded pretty good to me, but did not have the front at the same discount (nor with Prime shipping at all).  Sometimes Amazon is very strange.  I put the $103.00 tire in my cart and went looking at other sites.

Now, I do business with Dennis Kirk regularly, but somehow had not searched for the Battlax tires there.  Imagine my surprise when I found that I could get the 130/80-17 rear for $95.88 and the front for $93.88!  I threw a couple of heavy duty IRC tubes and some Kenda rim strips into the cart (why doesn’t IRC have rim strips?  Seems strange to me) and submitted the order.

Last night I put the tires on.  It was a good time to try out my new Harbor Freight balancing stand, and it worked quite well.  The front needed a single 10g weight, while the rear needed nothing (yeah, I didn’t believe it either, stood there spinning the tire over and over like I had some sort of neurological issue).

So.  Progress.  Still have some problems to beat with rubber hoses, but at least now I’m not afraid to ride it.

Part 2 coming soon… as in, whenever I fix those remaining hoses.

Two weeks with a vintage Honda CB650

It’s been going pretty well, actually. Several nickel-and-dime issues, such as a broken tachometer cable (the tach end rusted off; it was loose when I got the bike, and evidently got wet). I ordered new keys from www.keys4urride.com, and I have to say I was quite pleased with their service. The key number for my bike wasn’t on the list on their site, but I emailed them and they said they could do it for me, so I ordered two. They work well.

The only present issue is the gas cap leak. The O-ring is missing from the cap, and Honda doesn’t list it on the fiche as a separate part. I’m suspicious that it may be the part number 91258-300-013 (68X2.6) unit; I measure the space for the ring at 2 3/4″, which is about 68mm. I’m probably going to have to just take the cap to a dealer to size it.

Inspections, and Other Annoyances

Late last week I took the bike to get it inspected, and it failed… busted taillight, which I had not realized was bad enough to fail. Looking online, I found NOS lenses for $45.00. Seemed a bit high… instead, I ordered an entire taillight, not just the lens, for $26.00 including shipping on Ebay. This morning it passed inspection, and is now wearing a legal Missouri plate.

While riding it to and from the auto repair establishment where I got it inspected, I noticed the bike stumbled rather badly whenever I opened the throttle at highway speed (5000 RPM is about 55 MPH, and that’s where I noticed it). I remembered seeing that the 1980 CB650 had a service bulletin, so I actually read it. Seems that some CB650s from that year had exactly that problem, and the fix from Honda was a part set that rerouted the float bowl vents to the airbox cover. The part number for that set is 17225-460-670, and just this moment there is a guy on Ebay selling such a kit for $60.00:

http://www.ebay.com/itm/like/361410947063?item=361410947063&lgeo=1&vectorid=229466&rmvSB=true

I’m too cheap for that. I stopped by the auto parts store and picked up some vacuum hose and a tee that looked pretty close to what is pictured, then drilled a hole in the airbox cover that is just a bit tight on the hose I bought. It’s not perfect, but it did improve the bike’s performance; before, if my hand twitched on the throttle, the bike would stumble, but now I have to roll it on more to get the stumble and it lasts a shorter period. May break down and buy the “right” part at some point… dunno. It’s definitely serviceable as is.

I have noticed that it’s not hard to hit a “false neutral” when upshifting. I’m learning to shift with more authority.

One thing that now puzzles me. I’ve been making the mistake all along that the CB650 came in a standard version which was not “cruiser” styled, and a Custom version that was. I see now that I was mistaken… both models have the same cruiser seating position, but the Custom has some nicer amenities (and Comstar wheels, which may or may not be “nicer” depending on whether or not you like those). The puzzlement comes from those dang engine guards… how could anyone ever want them on the bike, when they obstruct the foot controls? But the original owner of this bike obviously liked them.

CB650, Finished (I think)

HOKAY DOKAY. So. Today I received the last items I needed to finish the job, and here it is:

Here’s another look at the headlight and signals, close up:

In the credit-where-credit-is-due department, I have to give a big THANKS to Speed Moto Co. That’s their headlight, headlight mounting brackets, and signals. Specifically, here are the items we used:

http://www.speedmotoco.com/product-p/smc-64313.htm
http://www.speedmotoco.com/headlight-bracket-p/144060.htm
http://www.speedmotoco.com/product-p/057-1-2009.htm

It probably would have been easier to get a headlight that had 7″ mounting points, but I think I’d have needed spacers anyway, just less length. And this is a really nice looking headlight, in my opinion… it does not look a bit cheap.

As I noted before, I got my spacers from aluminumspacers.com. If you visit their site, it looks like they only sell SAE parts, but actually there are metric parts mixed in with the nearest sizes of standard spacers… if I had not already found myself in the “ready to settle for less than perfect” situation, I might never have seen that they had the right thing. In fact, it’s probably why it took me so long to find a good source. And this is a company that makes the parts in the US. Admittedly, they’re just aluminum tubes, but still. I got two of the 19mm long, 19mm OD spacers:

http://www.aluminumspacers.com/spacers-by-hole-size/hole-for-3-8-inch-bolts/mas19-10-19

See, you can tell from the URL that they are in the 3/8″ hole size category. I don’t think they do themselves any favors, listing their parts the way they do, but the parts themselves are top notch.

New Headlight and Signals, and Other Stuff

Had a hard time figuring out where the horn goes; it had been relocated when the fairing was put on, and the mounting point is missing from the fiche. I finally felt all around the front of the frame until I found the mounting point hidden behind all those wires.

The parts we ordered came in a couple of days ago, and I have the headlight mounts and turn signals on the bike. I had a hard time locating spacers that would work with the headlight and brackets, but finally found them at (ahem) aluminumspacers.com. The brackets we got would actually mount a full 8″ headlight on the bike, but we got a 7″ unit that is really, really nice looking; the mounting holes set back and in a bit, enough that you could actually mount the headlight on a bike fitted for a 6.25″ headlight. As I say, though, it’s a really nice unit. I’ll post pics when it’s all together (probably late next week).

I ran into an issue with the turn signals. The replacement units did not say they were LED but they must be… they come on solid, no blinking, both the new front and the stock rear. I suppose I need an electronic flasher unit, which I have installed on other bikes before.

But I’ll admit my stupid here… I can’t find the flasher on the bike. The parts fiche shows it horizontal, but does not show where it goes. I’ve read elsewhere that it should be behind the left side cover, and I found the starter relay there (where I expected to find it) but cannot see the flasher relay. I can HEAR it click (once) when I turn on a signal, but I can’t find the darn thing.

Okay, never mind. I finally realized the only place I couldn’t see or touch was behind the starter relay; pulled it out of its rubber bucket and there was the blinker relay behind it.

Also managed to forget and leave the key on, running down the battery. Gah. Really, I don’t get rid of any stupid, I just move it around from place to place…

Stripping the CB650

Yesterday my daughter spent some time cleaning up the bike, while I set about removing the unwanted parts. I rigged the fairing with a rope sling to the rafters in my garage so I wouldn’t have to try to hold on to it while removing the bolts. It was a good thing, because the mounting frame was bent (and it looks as if it was bent when the fairing was installed, though I’m not 100% sure). After I got that off, I pulled the engine guards.

The original headlight and signals are long gone, of course. Original style replacements aren’t that hard to come by, but after some discussion we decided to go with a look-alike headlight instead along with some fairly nice OEM-like aftermarket signals.

So here it is stripped:

The fairing installation did not, it appears, require cutting any of the stock wiring harness. It all looks pretty good:

Here are the engine guards. I’m not sure what the deal is with them… they make the bike hard to ride.  I wonder if they were built for some other bike; I seem to recall that this CB650 was based on the the original CB400 four cylinder, which had a more upright seating stance.  I may try to sell them… I’m sure not putting them back on.

I put fuel system cleaner in the tank, filled it up and ran it some this morning. The treatment was intended for 21 gallons of gas (maximum); I used about a fifth of the bottle. It would probably be safe to use more than that, but I didn’t want to overdo it. The bike seemed to start more easily this morning, but I have no idea why that would be true.

Moving on…

Wow.  2012.  The last post I made on this blog was way back then.

Very little has happened with the Dream since then.  I’ll confess, getting the head apart stymied me long enough that I just sort of stopped working on it.  My wife rolled the chassis to the back of the garage, and pushed the engine (on its dolly) back beside it, and the boxes of parts are all with it, so if I ever get back to it, it’s all together.  I just feel out of my depth, mechanically speaking.

But a funny thing happened a few weeks ago.  My daughter found this 1980 Honda CB650 for sale on a local swap shop page for $800.00… a bargain, for a running bike.

Here’s the other side, with my TW in the background:

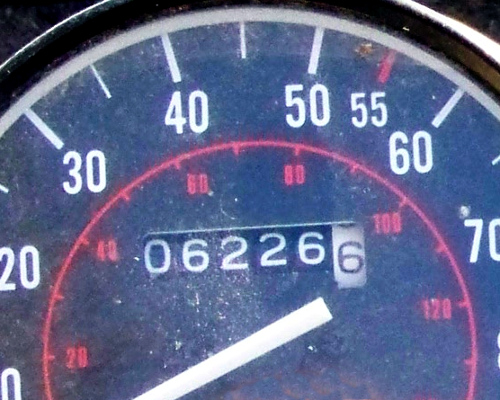
Note the mileage:

These pictures are all as-we-found-it, incidentally.

The story has it that the original owner bought it new around 1980. The bike had inspection stickers in two places: high up on the left fork tube, hidden by the fairing, and on the lower left fork slider (as you may notice in the first pic). The lower inspection stickers are 1991, so I’m assuming that’s the last year the first owner licensed it.

The original owner, I’m told, bought the bike for himself and his wife, and garaged it after she passed away. The fellow we bought it from acquired it a year or so ago, intending to ride it himself, but he lives on a gravel road; he scared himself rather badly, it seems, but it appears he did not actually drop the bike. The only damage is the broken right front turn signal, and the fairing has a ding and a crack that are consistent (in my opinion) with a garage fall… which the guy we bought it from said happened in a high wind.

As I say, he scared himself, and so decided to sell it. His choice of amount is what he needs to buy a shotgun, he said.

I took a test ride, and yeah, it’s not much fun on gravel. It runs a bit puny at low RPM but revs pretty nicely; I’m suspicious of some gunk in the carbs, and hoping some fuel treatment I added (along with fresh gas) will help.  I don’t relish pulling all four carbs and cleaning them.

The modifications were our main issues right now, though. There was a back rest on the bike when the last guy bought it, and he removed it; the bolts for the back rest are longer than the original grab bar bolts, so he did this:

I know hex heads were standard, but I replaced them with Phillips heads instead so they don’t snag on my passenger’s clothing.  I would have liked to use Allen heads instead, but had difficulty sourcing the correct type in a bright finish (black was easy, but would have looked strange).

Then there were the engine guards, which were pure evil. Just try to shift:

And then, I suppose you’d like to stop?


A Little More Progress

A couple of weeks ago, I used my new Harbour Freight bike lift to drop the engine out of my Dream.  I had previously removed the upper rear bolts and replaced them with temporary bolts (as I had to destroy the original bolts to remove them); the lower rear bolts turned out to be missing, and the two bolts through the head came loose very easily.

For some reason I couldn’t figure out just then, the wires from the condenser (part of the ignition system, screwed to the top of the head) were taped to the rest of the wiring harness; rather than deal with the tape, I just unscrewed the condenser and left it with the frame.

With the engine off, I was able to remove the top cover from the head without difficulty.  To my untrained eye, the cam chain looks pretty good… too bad I’ll have to break it to get the head off, if I can’t find the master link somewhere accessible.

I put the top back on, finger tight, then removed the carb.  It looks really good in the float bowl; apparently, the former owner drained it when he put it away.  The slide works well enough also, but I have not yet figured out how to remove the top to inspect it further.  Time for some research.

One bit of good news:  A friend has told me he can remove the broken stub of the steering damper knob from my Dream’s steering stem, and restore the proper thread.  I was worried I’d have to buy a replacement, but maybe not.