Some Updates I Overlooked

Jun 9, 2023:

So I have another problem, a minor one to be sure. The rubber grommet thingy for the upper rear mounting point of the side cover on the right has gone south. Looking at the fiche online, I can’t find side panels that look like mine.

CMSNL has two models listed for 1980, the XS650 and the XS650S. Here are the relevant bits of the diagrams they show there, First, the “standard” model:

yamaha-xs650-1980-a-usa-side-cover.png

And then, the XS650S:

yamaha-xs650s-1980-a-usa-side-cover.png

But my side panels don’t look like either of those. The first one is completely wrong, and the second really isn’t “right.”

Here’s what I’ve got:

20230609_110346-OL.jpg

And here’s the front rubber thingy:

20230609_110403-OL.jpg

The missing rear part seems to have been exactly the same as the front part circled above.

It’s going to be hard to buy a replacement if I can’t find a part number or proper nomenclature. Gah.

I found what I thought was a correct part on CMSNL, but the link has rotted so I’m not sharing it here.  It didn’t look exactly the same, and without measurements I was not sure how to tell.

Continued searching led to this:

https://www.ebay.com/itm/165153874696

As of right now (August 2023) the link is still good.  I measured my existing part and came up with the largest diameter at about 19mm; the part shown here is about the right size, if not perfect. And at $6.99 with free shipping for a pack of 4, it’s a cheap enough bet for me. Ordered.

June 10, 2023:

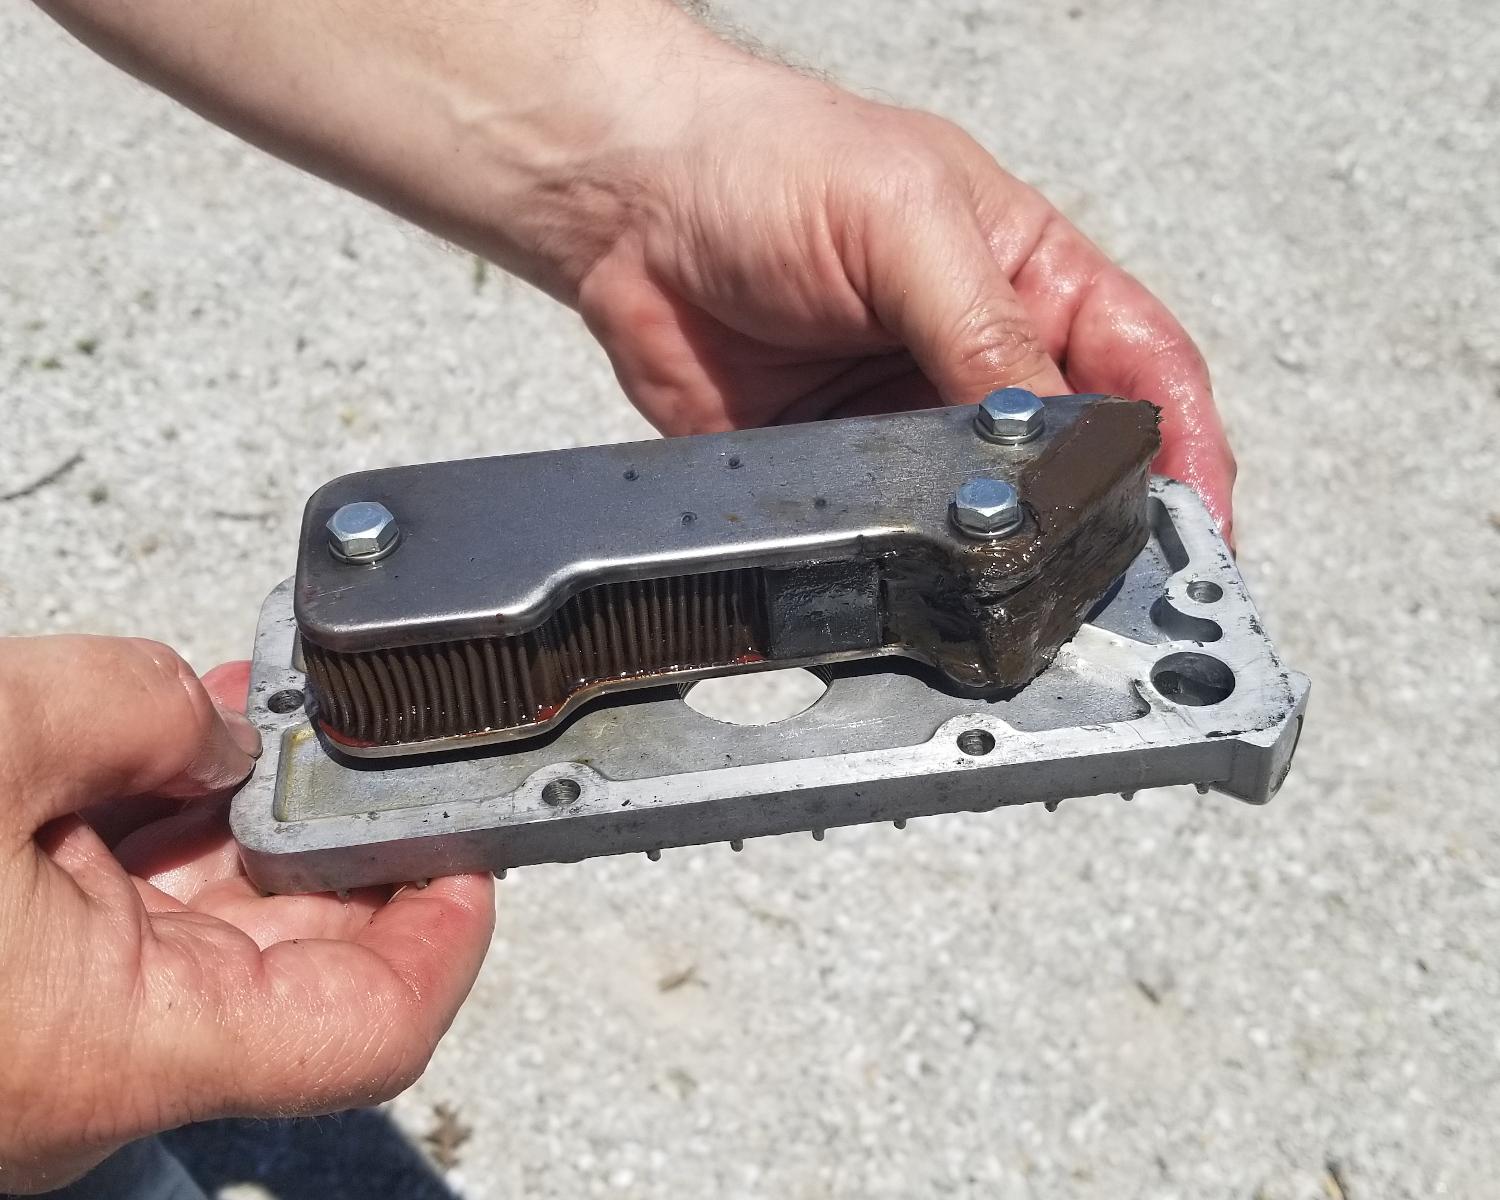
I got in a test ride a day after rebuilding the clutch, and the clutch worked absolutely perfect. Still feels crappy but it works fine. HOWEVER… evidently I didn’t get the case sealed. I had a lot of trouble positioning the gasket, and I don’t know what exactly I did wrong.

I could have taken it apart and done it over again, but honestly I have neither time nor patience left. So I took it to a local guy who specializes in vintage bikes, and I expect to have it back in a couple of weeks. He’s good, and he’s reasonable, and I can’t ask for more than that.

June 20, 2023:

xs650.com forum member 5twins shared a link for the correct side cover grommet:

“Yes, those side cover grommets can be difficult to figure out because the diagrams are incorrect. This is the one you need, thicker on one side than the other…”

https://www.partzilla.com/product/yamaha/90480-12053-00?ref=4a1f5410eb3bbc15b7551164e61beb85f42c778e

I had already ordered (and received) the cheaper eBay part mentioned above, for installation when the bike returned from the mechanic.

August 24, 2023:

So, an update. As I said, I took the bike to a local guy who specializes in vintage bikes of all kinds and he fixed my screwup. I had picked up the recommended O-rings literally years ago that seal the valve covers, but had never installed them; I took the baggie with me and he did that too, and only charged me about $160.00 for the whole job. Considering my incompetence at preventing oil from leaking, I felt like it was a good deal.

Incidentally… this is the first time since I got this bike that a had someone else work on it. I’ve done all the other wrenching. I certainly can’t say that about my 1980 CB650. The xs650.com forum makes working on the XS650 a science; there is no equivalent place for the CB650 SOHC models. The forum I do participate in for that bike just does not have the technical depth that the members of xs650.com have with respect to the XS.

Anyway… when I got the bike there was no easy way to get a replacement gas tank seal, but now Mike’s XS has them, so I ordered one there, and a set of four of the eBay side cover grommets from here:

https://www.ebay.com/itm/165153874696

No, they aren’t exact replacements, but they are about half the price. I found a rubber plumbing washer I’ve had lying around for years and put it on as spacer. Works fine, and makes me happy with the cheapness.

I got some shifter rubbers with the order from Mike’s and will probably replace the slightly chewed-up unit that’s presently on the bike. Somehow I tear them up, and then the metal tears up my shoes.

XS650: The Day After (the clutch repair)

NEXT MORNING:  The charger (really a battery maintainer) said it wasn’t fully charged yet, but I went ahead and disconnected the charger and tried the starter, and yes, it started.  I wasn’t sure if I’d have a problem, considering how long I had let it sit.

But… the vacuum petcock must leak down a bit, as the airbox seemed full of gas, which blew out onto the cardboard I use to protect my garage floor.  Ick. Pulled the bike outside, threw the cardboard in the trash (it’s trash day so it won’t sit around here for long), and let the bike warm up.

Ran it down the road south out of town, up over the 6,000 RPM mark, and no slipping.  Killed it in my driveway on the return; clutch was dragging a bit, and I realized I must have loosened the clutch lever adjustment when I first discovered the problem almost two years ago.  Corrected that, and am now happy with it.

Still hate that Michelin Commander II. It’s going for sure; the rear looks like it’s ready for replacement, so maybe I can get something I like better.

XS650, Much Later

Well, it’s been more than a year since my last post about the XS650.  I actually didn’t realize it had been that long.  But today I actually scheduled the afternoon off to finally rebuild the clutch.

For starters, getting the side cover off was a chore.  Using a narrow wooden board to direct force from the left side of the bike onto that boss everyone says is there to get the right side cover off didn’t work… I just chewed up the end of the board.  A prybar carefully placed behind the boss, using the downtube as a fulcrum, is what finally freed it.

But I misunderstood the admonition to hold in the kickstarter, and ended up pulling it out unintentionally.  I put it back in place using a trick I found in a video:

I’d like to take this time to ask you guys who make these videos… if you do a clutch rebuild video, please include the part where you remove the right side cover.  All the videos I found either start with that cover already off, or skip over that part which is part of why I managed to accidentally pull the kickstart mechanism out.

But as I say, I got it back in.  The next challenge was the screws holding the clutch together… in the video I watched, they were socket-headed, but in my engine (as in the video above) they are JIS.  So I got into my toolbox and got out my Vessel #3 JIS impact driver, grabbed a hammer and went to work.

Fifteen minutes of hammering and cussing later I still didn’t have a single screw loose.  Yes, I do know how to preload the impact driver… it just didn’t help.

As I sat there on the floor, annoyed and with my arthritic hands sore from the hammering, I had a thought.  No, that couldn’t work…

I washed up and went into the house, where I grabbed my 20V Black & Decker impact driver and a fresh battery.  Back in the shop, I got out the 1/4″ drive Motion Pro JIS bits I bought on a whim (never thinking I’d need them), dug out a #3 and loaded it into the driver.

Had those little buggers out in a jiffy.  Dang.

The next part was textbook.  Pull out the entire pack and lay it down in front of me.  Peel off an old friction plate and throw it in the trash pile; pick up a new plate (fully soaked in oil, of course) and install it.  Follow with a steel plate.  Repeat sequence until entire clutch is reassembled.

The new springs are stiffer than the old ones, but installed easily enough, though one screw kept stopping before being fully seated.  I finally swapped it with another one, and both went into their places just fine.  Go figure.

Took a break to go get some brake cleaner to help with removal of the gasket residue, and then oiled up the new one and tried to reinstall the side cover.  How the heck are you supposed to keep that gasket in place while you put the cover on?  Gah.  I finally found a skinny punch, no bigger than 6mm at the fattest part, stuck it into one of the top holes and used that and the locator pin at the bottom to hold the gasket while I worked the side cover into place.

That’s when I discovered that the exhaust blocks the reinstallation, if you have the kickstarter in the right place.  Removed a bunch of screws and taps and loosened the clamp on the crossover, then used my prybar to separate the right side exhaust from the left.

Finally got that cover back on.  Gah.  Carefully torqued it down, then tried to put the exhaust back on.  After another cussing interlude, I took the exhaust over to my workbench, grabbed a grinder, and carefully tapered the end of the crossover and thinned it out a bit.  I put on some grease as well, and the combination got it all back together at last.

I failed to pay attention to the order I took it apart in, and reinstalled the footpeg before the brake lever… then of course, removed the footpeg because you can’t do it in that order.  But then, with the brake lever, footpeg, and kickstart lever finally in their places, it was done.

Well, except for putting in the required 2,500 cc of 20W50 motorcycle oil. I use Valvoline conventional, bought at Wal-Mart, as noted previously. I have always avoided synthetic oils because of the wet clutch, but with new plates I wonder if it would be a good idea next time.

Tried to start it, but I had fallen off of my usual good habits over the winter, so the battery was almost flat.  Put it on the charger and called it a night.

More later (tomorrow, maybe).

Rolling out the CB650 for 2022

The sump oil leak was still ongoing when I rolled the CB650 out of the garage for the first time today. I reviewed the shop manual and found the torque specs I had previously missed: 7-10 foot-pounds for the M6 bolts in the crankcase area, which is obviously higher than the 5 lbs. torque than I used before. So I retorqued the suspect bolt and the two next to it after running the bike enough to get it up to operating temperature. We’ll see, but I’m afraid I will be dropping the sump to put in a new gasket after all. The bike is about due for an oil change, so I won’t be wasting the oil I dump out of it.

I have to say, it felt really good riding it the 3 miles down to the FS to fill it up with fresh gas.

I will be replacing the back tire soon; however, this is presenting a problem. The last time I replaced the back tire, I put on a Bridgestone Battlax BT-45 130/80H-17; I got the tubeless model by mistake, but got it mounted with some difficulty (with a tube, of course) and all has been well up to now. Previous research indicated that the “correct” size is 120/90-17, but you just cannot buy a rear tire in that size anywhere anymore. The 130/80-17 size I’ve been running is nominally 104mm tall, while the 120/90 would be 108mm. 130/90-17 tires do exist, but they would be 117mm tall, 9mm or almost 3/8 of an inch more than the 120/90 and 13mm or right at half an inch taller than what I’ve got on the bike now.

I should say, 130/90-17 tires do exist, if you can get them. They seem to be out of stock everywhere.

I can run the tire I have for a while yet.  Hopefully something turns up.

XS650 Update

So I see I haven’t posted updates about the XS650 recently. About the time I made the last post, I bought the clutch plates via Amazon, fulfilled by Speed Addicts in Yorba Linda CA, and they came in about a week. My shop is unheated, but the weather is warming up here so hopefully I can start on the clutch job soon.

I will add a note about that Michelin Commander II front tire: I did more research over the winter, and a LOT of people complain about vagueness, shimmy, or wobble with this tire. The reviews are overall pretty good, but the reviewers are mostly riding much heavier Harleys. Virtually all the negative reviews agree with my experiences. However, there are a few people who noted the tire improves after around 500 miles, so I’m leaving it on for a while just to see if that’s true.

XS60 Has A Shimmy, Oh My…

So… still waiting for clutch parts, but I took another ride to work today, about 40 miles each direction.

The bike has a “shimmy” now, at low speed; feels like when you’re riding on grooved pavement. Strangely, it doesn’t get worse at 55, but actually a bit better, and almost disappears in the corners. Did I do something wrong mounting the tire, or is it the tire itself? The previous tire was a Dunlop D401, put on by the previous owner; the new tire is a Michelin Commander II that I won as a “door prize” about a year ago. It went on easy and balanced with just one weight I recycled (there were two weights on the wheel with the Shinko mounted, and I needed only one of them to balance the Michelin). And I did as described in the shop manual, tightening the axle nut first on the right side before doing the front and then the back of the clamp on the left.

Not sure what’s going on. I don’t think it’s dangerous (I rode on wet pavement today without trouble) but it is annoying.

After some discussion on the XS650 forum, I put it up on the centerstand, propped the front of the engine up to lift the wheel, and did the wiggle test on the head and spun the tire. There is no play in the head and no bumpiness or other visible irregularity in the tire. And I checked for the nth time that the tire is installed the right way (there’s an arrow in the sidewall on one side, and a smaller arrow on the other right at the tread edge). I’m coming to the conclusion that it’s just how this tire rides.

The rear tire is a Shinko, and it’s still installed. I never noticed any shimmy with the Dunlop.

XS650 Preparations, 2021 Edition, Part 2

Tonight I installed the new Michelin front tire I won in a giveaway almost exactly a year ago; I forget what exact model of tire it is, but I’ll post it when I get a chance to look. It went on wonderfully, which was a relief because it’s my first tubeless tire replacement. I also got that darn cam chain tensioner adjusted, and then I took it for a ride.

There was rain coming in from the north, but just the tip of a larger system that was heading southeast, so I went south and then west and picked up the end of the Bee Ridge Road and ran that to Edina, Missouri. Got some gas at the Casey’s and rolled back out for home. I had threaded the needle between two rainstorms on the ridge road, and I saw that I would have to do thread another to get home dry; the clouds were glorious ahead of me, but threatening on either side as I took Highway 6 back to my home in La Belle, Missouri. The streets were wet but the air was dry, and I got in with no unpleasant dampness.

HOWEVER… on the highway heading home I considered passing a slower vehicle, and I rolled the throttle on. Around 5,500 to 6,000 RPM the clutch started slipping. I’m using Valvoline conventional 20W-50, MA1, so I’m assuming it’s not the oil, but an actual worn-out clutch pack. Doesn’t look too hard to replace. I don’t ride on the Interstate much at all, so I may leave it for a couple thousand miles so I don’t waste all that oil I just put in. I also noticed the front brake pads are ready to be replaced, so I suppose I’ll order all the parts for both jobs and get them done, eh, maybe next year, no faster than I’m going. I have two other daily riders so if I find I have to park it again I suppose I can. Annoying to get the unfinished work done, only to discover more, but with a vintage vehicle what do I expect?

Getting the XS650 Ready, 2021 Edition

I still don’t have my XS650 ready for the new year, but today I got closer. See, last week I finally got around to changing the oil. When I originally changed the oil in this bike, I pulled the sump filter for inspection, and of course it was damaged. So I set out to fix it with JB Weld and denim, of all things, as documented on this blog previously.

I was told at the time (in replies to this post on the XS650 Forum)  that this was a bad idea, that the denim would shed fibers into the oil and destroy everything. But all seemed to be well, and a couple thousand miles later I did an oil change but didn’t drop the sump plate that time. So last week I drained the oil and dropped the plate for inspection, and this is what I found:

XS650-20210613_132659.jpg

As you can see, it looks almost exactly like it did when I put it in. The denim is undamaged, the coating of JB Weld is more brown than it was but also basically undamaged.

So I set out to reinstall the sump plate, and I almost immediately broke off one of the screws. They all felt wrong, to be honest, and I should have known not to tighten them down when I felt them, well, not getting tight. I removed the screws I could get at, and they were all visibly compromised. I had torqued them to 7 ft.-lbs. as specified in the shop manual, and I don’t think there’s a problem with my torque wrench, but who knows?

Took some looking to determine that they are supposed to be M6-1 x 25mm, property type 8.8. I hit the hardware store today and got a bag full of them, and after lying down in the garage for a while managed to work the broken bit out of the hole. Fortunately there was just enough metal sticking out to get a grip with pliers and twist it free.

XS650-20210618-doing-repairs.jpg

This time I torqued them by “feel” using a small quarter-inch ratchet. To be honest, I’m not sure I didn’t compromise the replacements, but I tried to be careful. The ones I took out had held the plate oil-tight for 4000 miles, so I’m going to give these a try as is. I’ve been warned in the past not to use stronger machine screws than called for by the manufacturer, but I have to wonder if I should have tried 10.9 screws instead.

Still have to adjust the cam chain tension and swap out the front tire before she’s ready to ride.

Stalled

So, story time.

I pulled the CB650 out to run some errands, and while I was out I filled up with gas. It’s about 3 miles from the FS station where I filled up to my home, and I came home without incident and parked the bike for about an hour. I was planning to ride it about 25 miles to see a customer, and so about an hour later I started it up and took off.

I went about another 3 miles or so, and the bike died like it ran out of fuel. I rolled into a driveway and tried to restart it, and while the bike was cranking good and hard it wouldn’t go. It really did sound like it was out of gas, so I flipped the petcock to reserve, and it started up after a very little bit of cranking.

I turned it back from reserve to “run” or whatever you call it, and rode back home and parked it without difficulty.

I’m guessing something plugged the upper end of the petcock tube, and flipping it to reserve and then back must have cleared it.

CB650 Oil Leak

I got the 1980 CB650 out one time earlier this year. It was, as always, a struggle to get it started after it sat for about two months, and I vowed to keep starting it every few days to avoid the battle in the future. I had replaced the front tire with a Bridgestone Spitfire S11F 100/90H-19 in place of the discontinued Bridgestone Battlax BT45 I’ve been running. I hope the BT46 model is as good, since I still intend to run it on the rear. I did pinch the new tube (gah) and rather than patch it I bought a heavy duty Kenda tube instead.

So as I say, I took the CB650 for a nice 20+ mile ride, one of my local ridge loops, and was pretty happy.  Until the next day when I saw an oil spot under the bike.  I wasn’t 100% sure the oil was from that bike, so I got a flattened-out cardboard box and parked the bike on it to be sure.

Yup.  Oil leak.

Lying down on the box, I could see that the bike seemed to be leaking around the edge of the sump.  Another bad gasket, I assumed, and I started making plans to get a new one and get it installed.

Then I remembered how I quelled the top-end oil leak of my XS650 by retorquing the head.  I decided to try retorquing the sump bolts, but to do that I needed to know the torque specs.  Honda, it seems, did not publish torque specs for the sump bolts.  Gah, again.

The slightly larger bolts securing the sump plate to the XS650 had a 7 ft-lb spec, I noticed; so I set my torque wrench for 5 ft-lbs and retorqued the Honda’s sump bolts, starting with the one in the middle of the left side and working out, in alternation, first one more in front, then one more in back, and so on until I had readjusted the entire left side to that torque.  I decided, based on where I saw oil on the sump, to stop there rather than going on around, and maybe later I’ll regret that.  Who knows?

What I do know is, I took the bike out for another similar loop and parked it over a fresh clean white paper towel.  So far, after about four days, no signs of further leakage.  Keeping my fingers crossed…